Gbyte Recovery
Free scan and preview of your iCloud backup content. Selectively extract messages, contacts, and more from any historical backup point.
Table of contents
If you’re an Apple user, your iCloud backup is like a digital goldmine. It holds your photos, messages, and app data. Yet for most people, that data feels locked away behind Apple’s restrictions.
Usually, there are three big problems that get in the way:
You only see the basics: In your settings, Apple only shows you the backup size and time. You can't click on it to see your actual photos or files.
Limited history: While your device backs up to the cloud nightly, Apple only keeps a few versions. If you need something from a specific date, your options are limited.
The "Reset" trap: Traditionally, the only way to view the contents of an iCloud backup was to erase your whole phone and "Restore" it. Most people don't want to wipe their phone just to find one deleted text or photo.
But your data doesn't have to be a mystery. In this guide, we’ll show you how to view more about your iCloud backups like specific messages, photos, the available restore points without resetting.
It’s time to take full control of your digital data and break through these limitations.
Before we dive into the details, use this table to find the best method for your needs.
Method to View iCloud Backups | What You Can See | Best For... |
iCloud Backup Settings | • Devices with iCloud backups • Backup size • Latest backup time • Which apps are being backed up | Quick storage management. |
iCloud Backup Extractor | • All restore points (full history) • Actual files inside iCloud backups | Finding specific files in latest or older backups without a phone reset. |
Reset & Restore your Device | • Most recent restore points • Actual files in the iCloud backup | Setting up a new phone or a full recovery. |
iCloud.com/recovery | • Archived versions of Files, Calendars, Contacts, and Safari (last 30 days) | Restoring accidentally deleted sync data. |
iCloud.com | • Real-time synced photos, notes, and files | Accessing live data from any web browser. |
When you are logged into your Apple ID on an iPhone, iPad, or Mac, you can easily view the basic details of your iCloud backups. Let’s use the iPhone and iPad as an example.
Go to Settings > [Your Name] > iCloud > Manage Account Storage (or Storage).
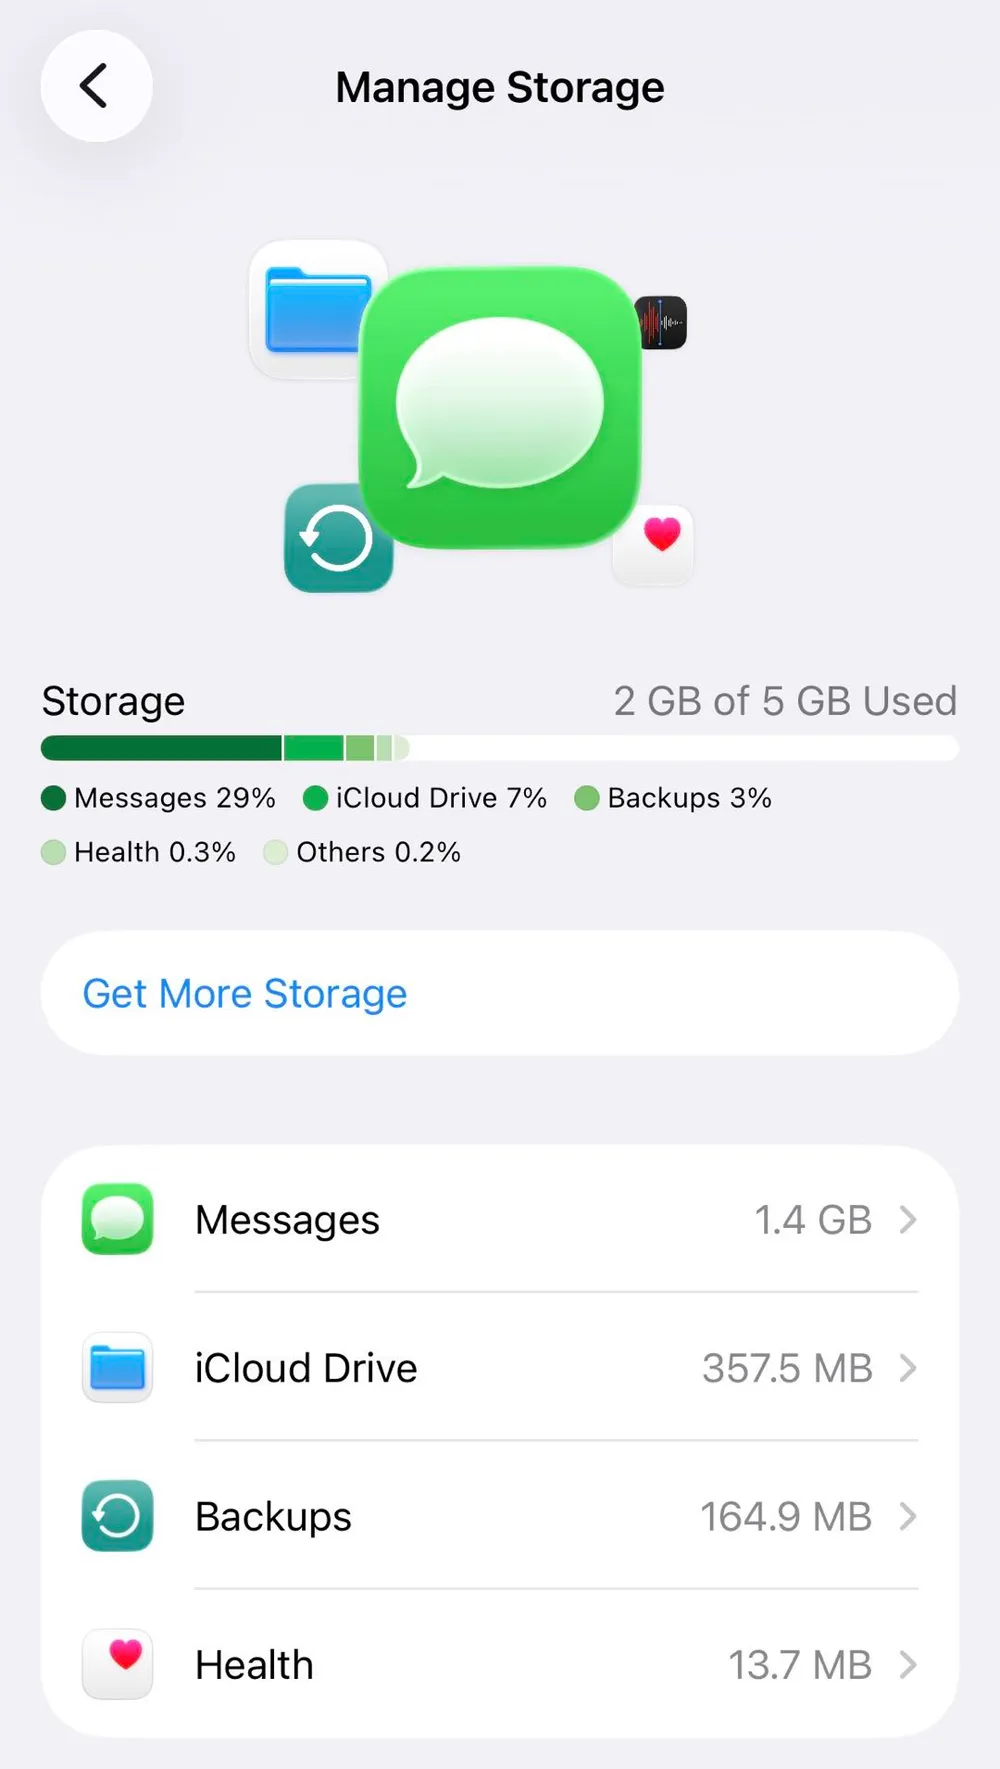
On this screen, you can see exactly how much space your backups are taking up. For example, my backup file occupies 164.9 MB, which is roughly 3% of my total iCloud storage.
To see more specifics, go back to the main iCloud screen and tap iCloud Backup. (Path: Settings > [Your Name] > iCloud > iCloud Backup)
Here, you will find several key details and options:
Back Up This [Device]: When this is turned on, your device will automatically update your backup to iCloud every night to keep your data current. If you turn this off, your existing backup files will not be deleted.
All Device Backups: Every device linked to your Apple account can create its own separate backup. This list shows all devices that currently have backup data stored in your iCloud.
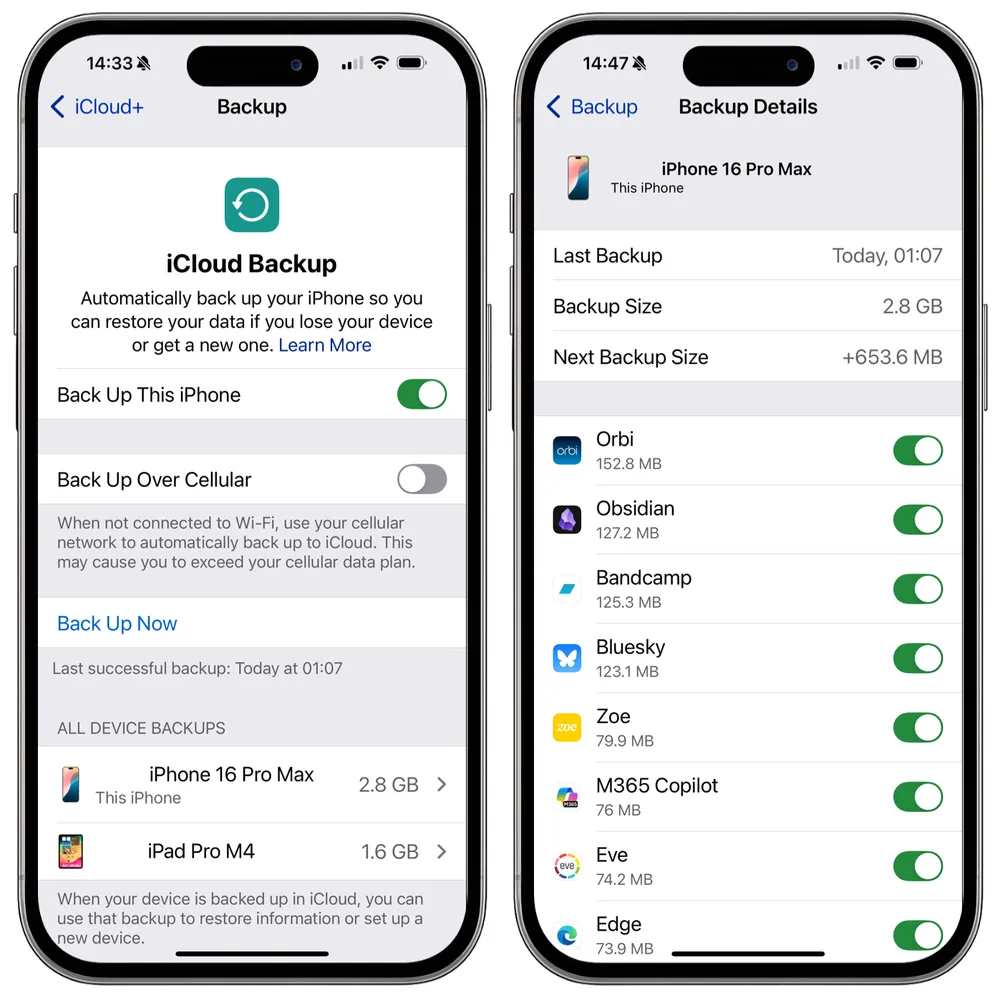
Tap on a specific device from the list to view its backup details:
Latest Backup: The date and time the device was last backed up.
Backup Size: The total size of the current backup file.
Next Backup Size: The estimated size of the next backup based on new data added since the last one.
App Toggles: You can choose which apps are included in your backup. If you toggle an app off, its data will be removed from the backup.
Tip: Toggle off unimportant apps to reduce your backup size and save iCloud space.
Delete Backup: Tapping this will delete that device's backups from iCloud entirely.
Notes
While this screen only displays information for the latest backup, iCloud actually stores multiple restore points for each device in the background.
For Mac Users: You can manage these settings by going to Apple menu > System Settings > [Your Name] > iCloud > Manage > Backups.
For Windows User: You can only view iCloud storage by using iCloud for Windows app (download it first if you don’t already have it)
If you want to view exactly what’s inside your iCloud backups without resetting your phone, a specialized tool like Gbyte Recovery is the safest choice.
This software is based on iCloud data extraction. It scans your iCloud account to find all available backup points and lets you preview the actual files for free. Your privacy is protected throughout the process, as all data remains encrypted.
Why Choose Gbyte Recovery
The Only App for True iCloud Backup Extraction: Other "iCloud backup extractors" only show iCloud sync data, which is not the same as a full backup.
Advanced Snapshot Analysis: Gbyte compares different backups to find data deleted over time.
More Restore Points: Access a deeper backup history than Apple shows during standard restores.
Supports 30+ Data Types: View photos, messages, and chats from WhatsApp, Instagram, Messenger, and more.
What Can You Do with Gbyte Recovery
Recover Deleted Data that are no longer on your phone from older iCloud backups.
Recover Data from a lost/stolen Phone and you don't have a computer backup.
Extract Data to Your Computer: Easily download messages and chat histories directly to your PC or Mac, something that isn't possible through iCloud Web.
And more...
How to Use Gbyte Recovery
Step 1. Install and launch Gbyte Recovery on your computer. No computer nearby? You can also initiate a free scan directly on your mobile device.
Step 2. Choose your data type (e.g., WhatsApp, Messages, Notes, Photos). The scan will focus on that category. Then click "Scan".
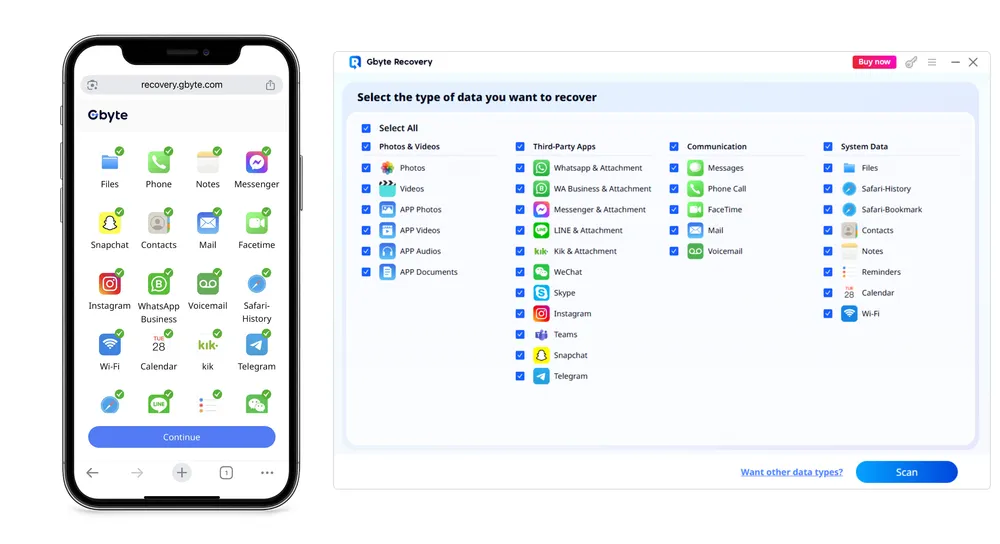
Step 3. Securely sign in with your Apple ID.
Step 4. Click "Scan" and wait for the process to finish. Once complete, preview all data in your iCloud Backup for free—deleted items are highlighted in red.
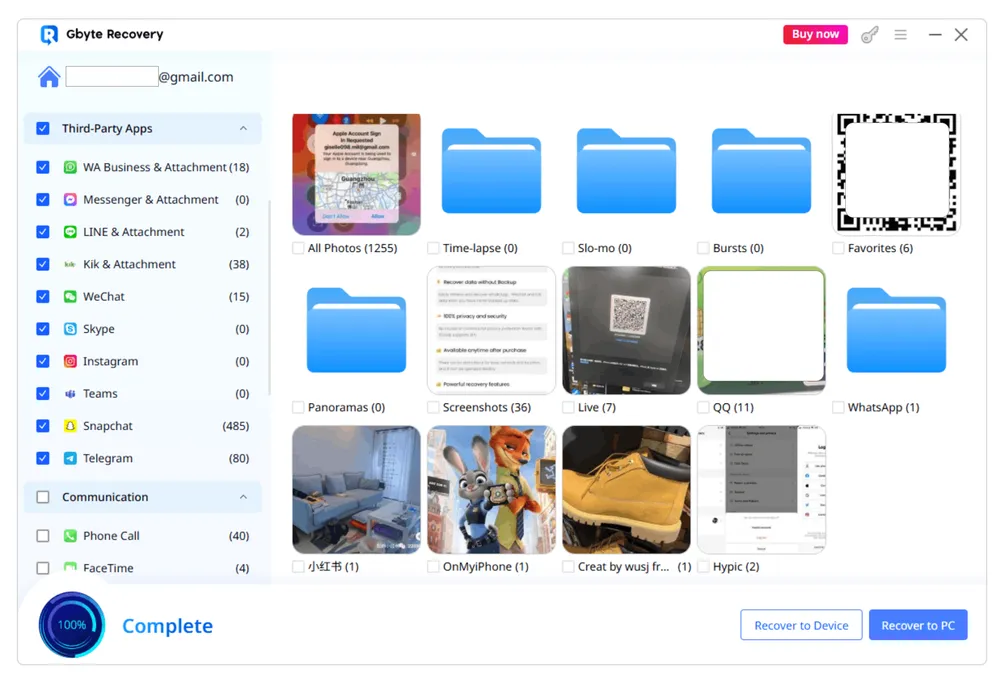
Step 5. Tick the checkboxes next to the data you want to restore, then click Recover.
iCloud often stores several versions of your backups to help when transferring data to a new device. When you actually go through the official restoration process, you can often see more restore points than what is visible in iCloud Backup Settings (Part 1). Once the restoration is complete, you can browse the device to see exactly what was saved in that specific backup.
What You Need:
A factory-reset iPhone or iPad
Your Apple ID and password.
Warning: If you are using your primary iPhone, you will need to wipe it completely. We recommend using a spare iPhone for this process if possible. Restoring a backup will overwrite everything currently on the device; any data created after that backup was made will be lost.
Step-by-Step Guide:
Erase Your Device: Go to Settings > General > Transfer or Reset iPhone > Erase All Content and Settings.
Tip: You can create a fresh backup to computer using iTunes, App Devices, or Finder. This way, you can easily "roll back" and recover your current data later.
Reach the "Apps & Data" Screen: Follow the setup instructions until you see the option Restore from iCloud Backup.
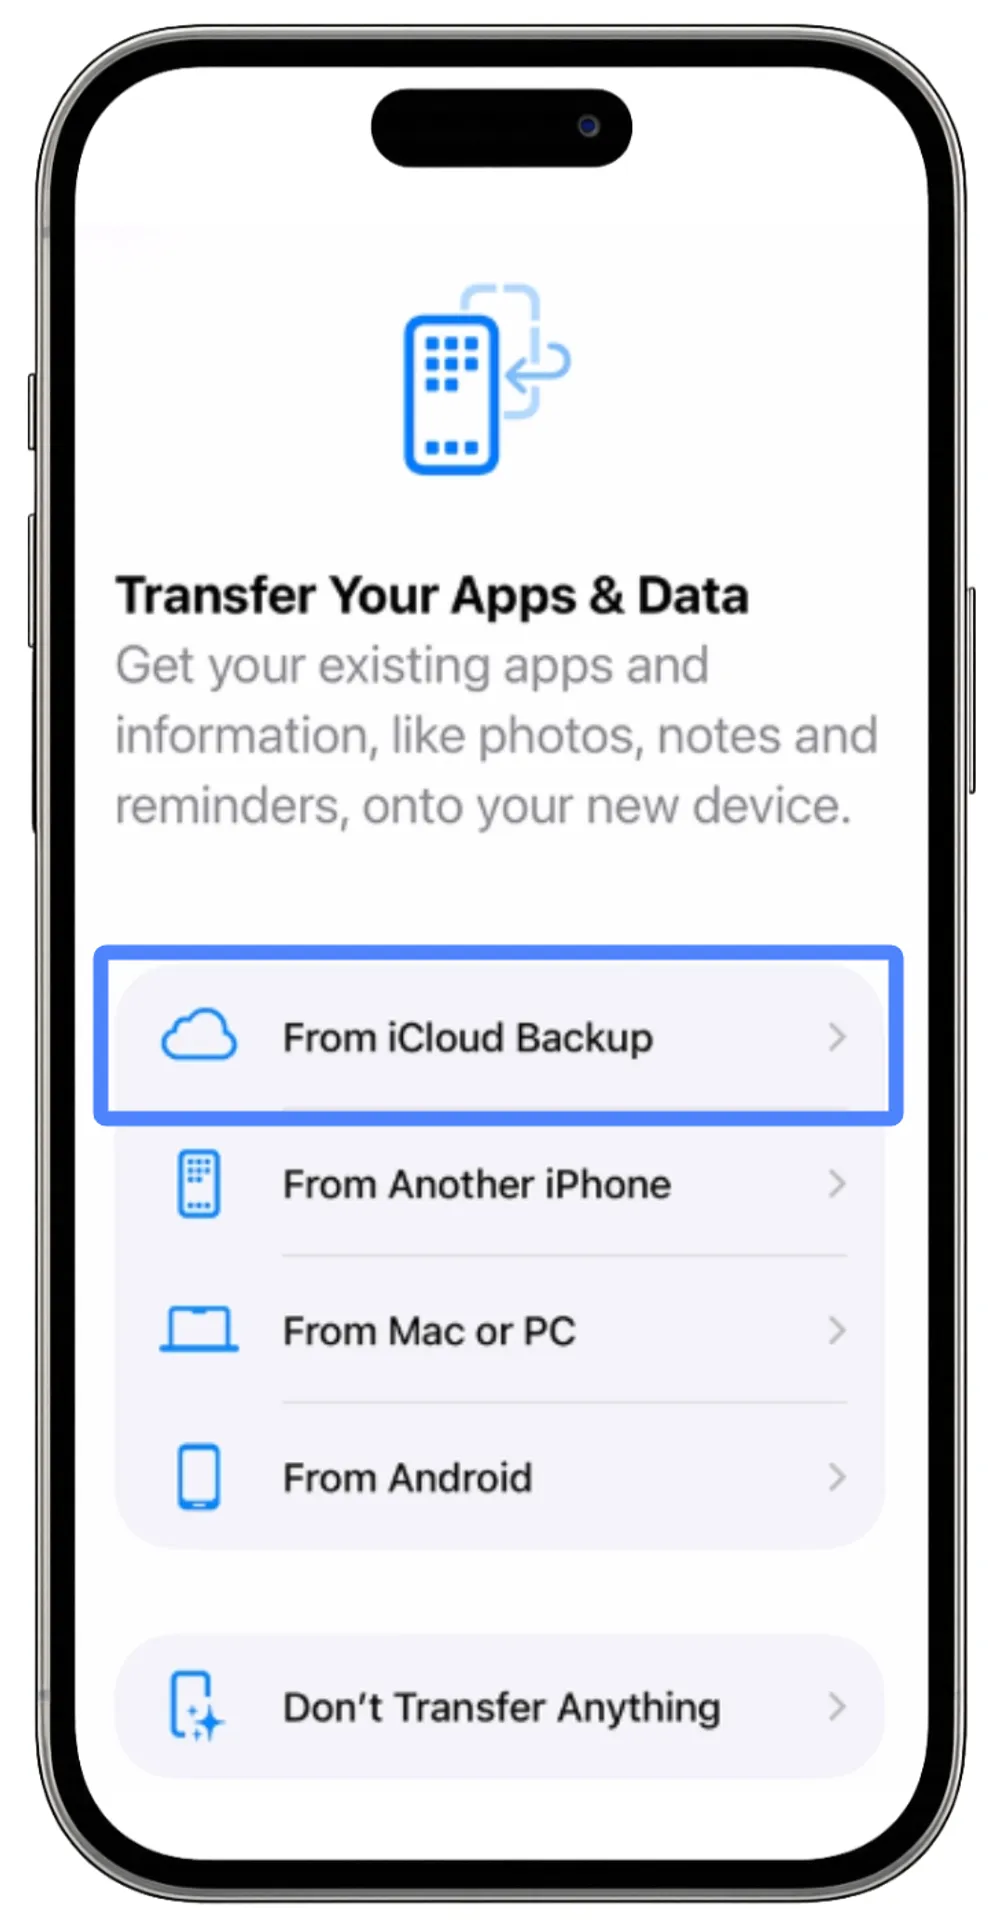
Sign In: Enter your Apple ID and password.
"Show All Backups": On the selection screen, look for a button that says "Show All Backups." This will reveal older snapshots that were hidden in your device settings.
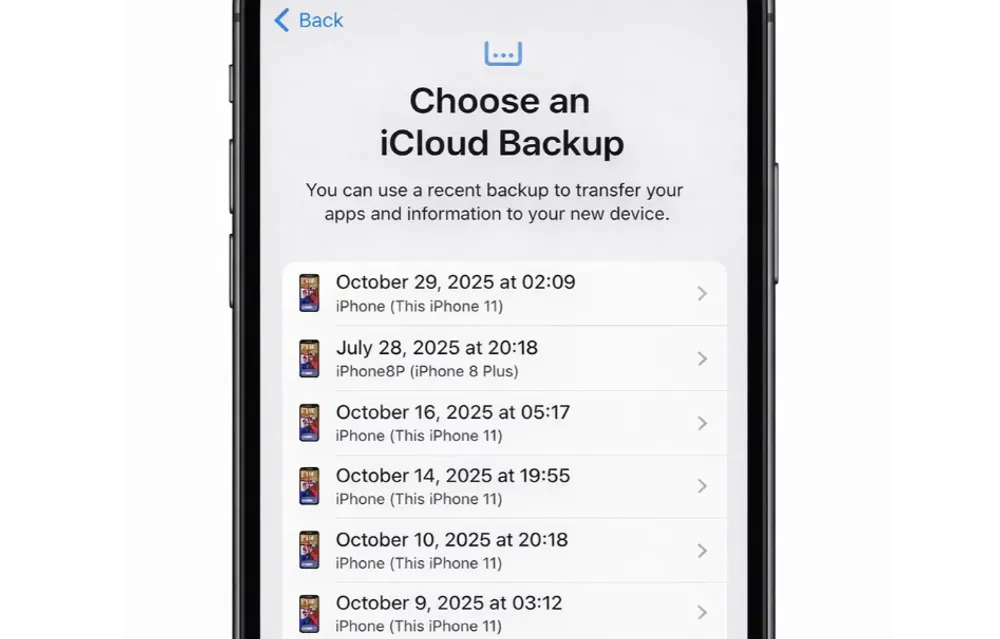
Select and Restore: Choose the specific backup point you want to investigate. Once the restore finishes, your phone will be a "time capsule" containing the exact files, photos, and messages from that specific date.
While a full iCloud Backup (Part 3) takes a snapshot of your entire phone, Apple also keeps a separate, "mini-backup" of your synced data.
When you change or delete certain types of data, iCloud automatically archives an older version for you. These archives are kept for 30 days, giving you a window of time to revert to a previous version if you make a mistake.
Supported Data Types in this "Backup"
iCloud Drive Files
Calendars & Reminders
Contacts
Safari Bookmarks
How to View and Restore Your Data
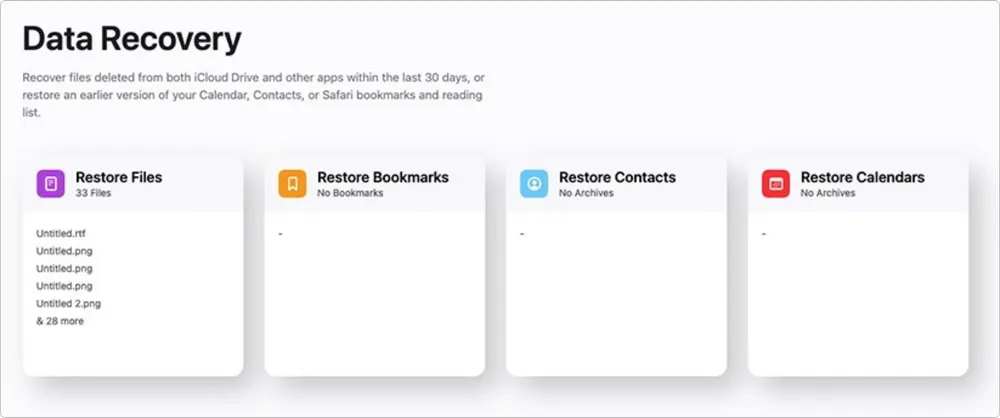
On your computer, sign in to iCloud.com/recovery using your Apple ID.
Select one of the four categories (Files, Bookmarks, Contacts, or Calendars).
iCloud will show you a list of "archives" or "snapshots" labeled by date and time.
For Files, you can select individual items.
For Contacts and Calendars, you choose a specific date to restore the entire list.
Click Restore next to the version you want. Within a few minutes, that older data will "sync" back to your iPhone, effectively replacing the current data with the backup version.
In addition to full device backups stored in iCloud (covered in Parts 1–3), iCloud also stores data for individual apps. This app-level data is easier to access and can be viewed instantly on the web without restoring your device.
How to Access This Data on iCloud.com
If you want to view the files, photos, and app data currently stored in your iCloud account, follow these steps:
Go to iCloud.com on your computer or tablet.
Sign in with your Apple ID and password.
You will see tiles for different apps. Click any app to view the data currently saved in iCloud, including: Photos, iCloud Drive, Notes and Reminders, Contacts and Calendar, and Mail.
Some data types cannot be viewed directly on iCloud.com, such as Messages, WhatsApp chats, and other third-party app data. To access this information, you need methods beyond the iCloud web interface.
In addition to extracting iCloud device backups, Gbyte Recovery also supports viewing this otherwise inaccessible iCloud data.
Sometimes your iPhone backups are saved directly on your Mac instead of iCloud. Here’s how you can view them:
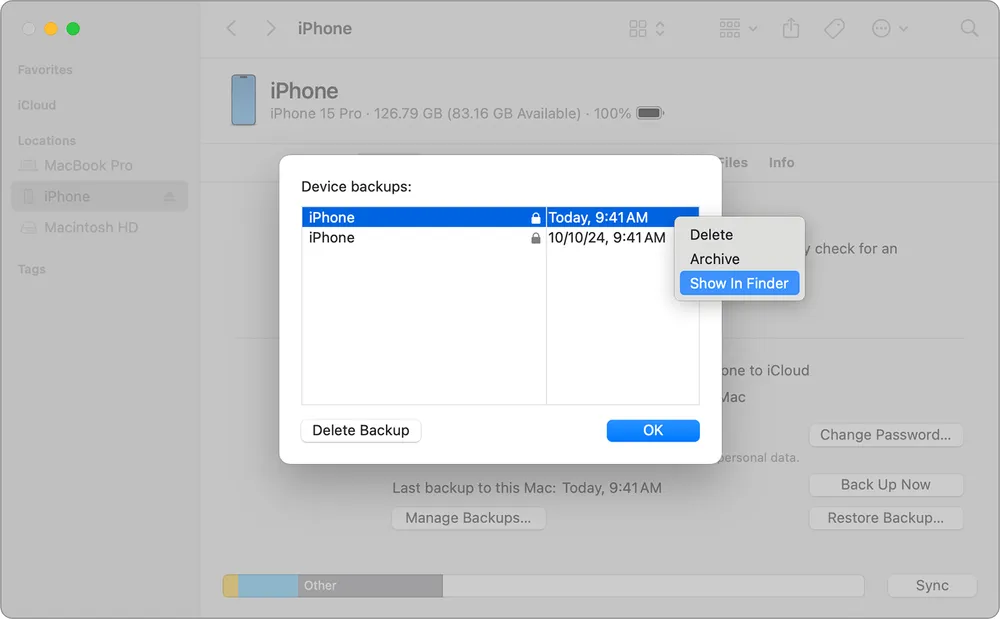
Step 1. Plug your iPhone into your Mac. When prompted on your phone, enter the passcode and tap Trust This Computer.
Step 2. Open Finder on your Mac, then click the iPhone icon under Locations in the left sidebar.
Step 3. Go to the General tab and click Manage Backups. You will see a list of all backups stored on this Mac.
Step 4. Right-click any backup to choose Delete, Archive, Show in Finder, or Show in Explorer.
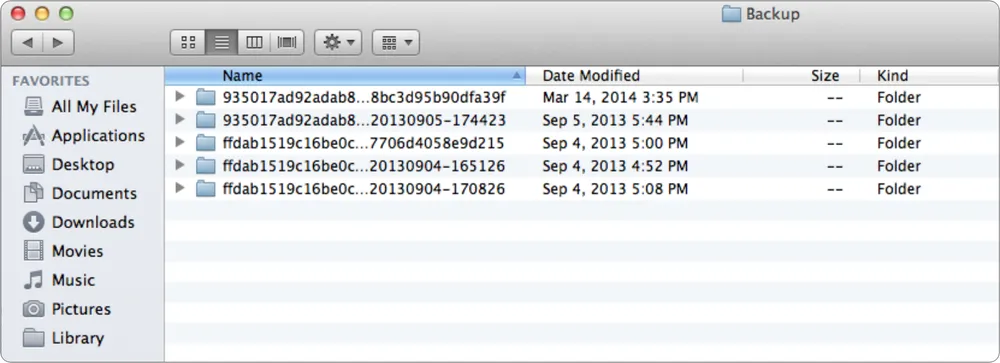
Step 1. Open Finder, select Go > Go to Folder.
Step 2. Type or copy and paste ~/Library/Application Support/MobileSync/Backup/ in the pathname window.
Tip
You can only view the backup list and timestamps, not the actual content inside.
Many tutorials list this as a way to "view iCloud backups." That’s not correct. These are local backups stored on your Mac’s hard drive, not on Apple’s cloud servers. Deleting them will only free up storage space on your computer, not on iCloud.
iCloud backups can feel confusing because Apple offers more than one type of backup and also mixes in synced data. On your iPhone, iPad, Mac, or Windows PC, you can only see the basic information: device name, backup size, and the last backup time. On iCloud.com, you’ll find separate backups of Files, Contacts, Calendars, and more, which you can restore directly. If you want to look inside a full iCloud backup, your only options are restoring the backup to a device or using a third-party iCloud viewer tool like Gbyte Recovery.
By knowing where your backups live and what each type contains, you’ll be better prepared to manage your storage, confirm your data is safe, and decide which backups are worth keeping.
Gbyte Recovery
Don't wait until your data is gone forever! Try Gbyte iOS Recovery for free—scan first!
100% secure. Your data always stays private.
Share


Related articles
The installation wizard will automatically start after downloading.
After registration, the recovery process can be managed through the web interface.
You get it all with your purchase - no locked features, no hidden limitations.